SF Cable Blog - Get Expert Tips & Advice on Cables & AccessoriesIn our blog, we educate customers on the various types of cables, components and accesscories for computer, laptops and mobiles. Find More Blog
|
|
|
When it comes to getting an internet connection in the new house, a wifi connection is always preferred over wired networks. However, if you want to have a faster and more secure Internet access, a wired network is a better choice. For wiring the home network, you will need some good quality Ethernet cables. Here’s a little do-it-yourself guide on how to go about it.
Work out a planDon’t directly go about laying cables. We need to take a systematic approach here. Firstly, you need to target the room you are going to wire. The length of the room will help you to decide upon the length of Ethernet cable. Secondly, you need to work out the number of ports you need for the location. The wall plates available for the ports have 1, 2, 4 and 6 jack configurations. Thirdly, you need to decide the network speed. And last but not the least; you have to decide the path that your cable will take. If you have a multi-storeyed house, you can start from outside. In order to wire your house smoothly, you must draw a rough sketch of your house. Purchase the required materialNow, it’s the time to order the materials you need. You can choose to order online instead of going personally and haggling with the retailers. In order to implement an internet cable you might need the following. Fix the wall plates Once you’ve figured out the location for fixing the wall plate, line it up and measure its size. Then you can draw outlines on the wall. It is a little complicated to punch a hole during this process. You can make use of stud finder to ensure that you do not hit the stud. Thereafter you can cut the hole and leave wall plates off. Set the cable In order to run your cable, you need to check the cable length for each run. Start running a cable to every room from the distribution room. Then gently pull the cable out and run another cable in the same way. Drill holes in the walls, pull the cable out and make sure that no cable remains inside the wall. Thereafter, give labels to the cables and take the measurement of cable length. Keep some extra cables for crimping and stripping. Attach cables with jacks The next task is to wire the cables. Strip off one inch of outer jacket from the cable and push wires into the keystone jack by matching the color code which is marked on it. Then, use the punch down tool to punch the cables to keystone jacks. Once the cables are connected, attach the jacks into wall plates. And last but not the least, mount the plate on the wall by fixing it with screws. Check the network After everything is fixed, it’s time to test the network with the help of network cable tester. If LEDs on the tester start flashing, it is an indication that the Ethernet plug is connected rightly. Connect the network if you feel everything is in its place. Establishing a wired network for home is not that difficult. And we have simplified the wiring process for you. If you think the above procedure is too lengthy or complicated, you can always hire a professional to set up the internet connection for you.
0 Comments
When it comes to buying any kind of wire connectors, for example, computer connectors or adapters, people are overconfident. This is because they are unaware of the fact that not all wire connectors are built in the same way. This article will highlight some common blunders that occur while buying wire connectors. It will also provide you with the insights to avoid these errors. 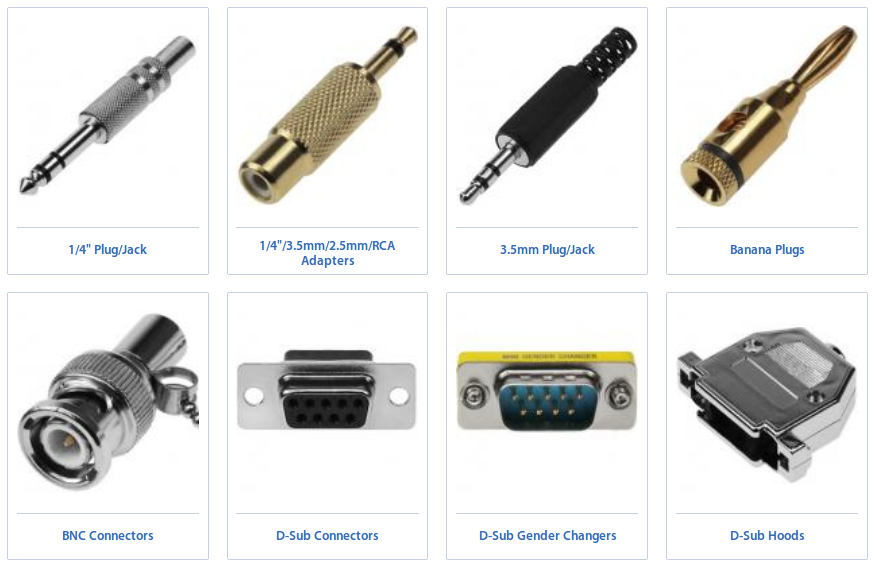 Choosing the wrong sizeThe “one size fits all” logic cannot be applied here. When a wire fits into the connector, we often assume that it is perfect for typical splices. This is not true as only specific wire combinations are approved by UL for every connector. If you do not choose the right size, it can result into failed connections and useless repairs.
Solution: Get yourself acquainted with wire connectors and know which wires they can fit with according to the UL specifications. If you are unaware of such specifications, you can also check them on the website of the manufacturers. In case information like this is missing on the website, you should speak to the manufacturers or authorities of the firm. As they have the list of wire connectors and their UL specifications, they will be able to help you with the details in best way possible. Overlooking the voltage detailsThere are times when people do not choose the exact voltage required and end up buying either low or high voltage connectors. Some also tend to use whatever is available at the moment. This should be avoided at all costs as you will have to redo the connections. Not just that, you will also lose the money you have spent on installing the inventory and other equipment. Solution: There is just one. Conduct proper research on the voltage needed for each wire connector. Read the specifications and then finalize it. Giving too little or too much torqueYou need to be careful here! This is because if the torque applied is too less, it can result into arcing, which can cause a fire hazard. Moreover, if the connection is weak, the system will not work in the right way. Hence, make sure that you take your own time to tighten every wire connector. On the other hand, if the torque applied leads to tight connection, it can cause a damage to wire connectors. Solution: You need to ask yourself questions like, “Is the connector too tight?” “Are the wires outside the connector twisted?” “Is it possible to pull the connector without twisting?” The answers to the first two questions should be No. And the answer to the last question should be yes. However, an electrician can be a better judge of the torque intensity. The above mentioned are some of the most commonly occurring mistakes which can lead one to having accident prone surroundings and poor connections. The time and money spent after these tasks are additional pain points. So make sure you take your time and choose your wire connectors wisely! Buying SVGA cables might sound simple to you. And with everything available online these days, purchasing monitor cables is just a matter of a click. However, even after buying SVGA monitor cables, people experience poor image quality. This is because they have failed to consider certain important aspects. There are three major factors you need to keep in mind before buying these monitor cables.
 Now let us understand each of these aspects in detail:
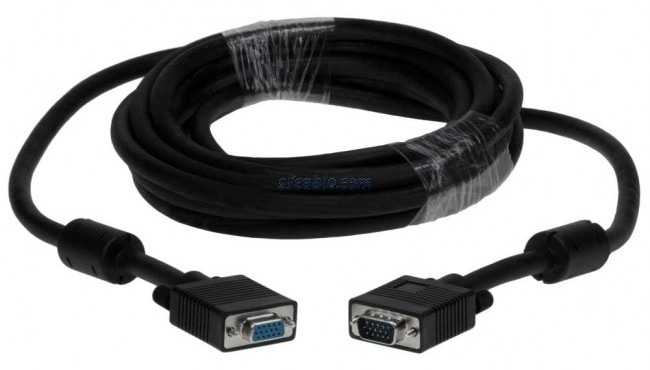
1. Type of monitor: Standard/Widescreen The latest widescreen monitors use SVGA signal which gets processed by using DDC Channels. These DDC Channels make the resolutions such that they fit the pixel ratios of the screen. If the DDC channels are absent, the image formed on the screen is poor and does not fit the screen. It is easy to figure out if the monitor output device is DDC compatible. All you need to do is look for Pin 9 which is sometimes missing in normal SVGA. 2. Distance from the output device Ideal length of an SVGA cable is 2M. But when several monitors are mounted on the walls, longer cables are used. If people have followed the right cable standard, there are times when they go up to 50M. It can make things a little tricky. You need to understand that cables that are of low quality do not give good signals. This in no way means, superior quality cables are always compatible. To assure that you have ordered for the right cable, check if the cables have Ferrites on both ends. You can also find out the manufacturing details and the guarantee offered on the cables. In case you if you are going to use the cable to cover long distance, you can also consider purchasing a powered signal booster so that there are no compromises involved with the performance. 3. Age of your PC One of the biggest reasons as to why people get disappointed with the quality of image is because they might be using the cable from old monitor. As mentioned above, it also might be an output device that doesn’t support DDC output. If your PC is old, the only choice you have in order to get better quality image is to get rid of it. But if your cable is old, you can definitely replace it with a new one. It is just that the new cable should be compatible with the version of your PC. The above steps will make your SVGA cable shopping easy and stress free. When in doubt, you can also seek advice from the manufacturers. Make sure you choose the right monitor cable. |
Author
Archives
October 2022
Categories
All
|
 RSS Feed
